Tips, Tricks, and Tutorials

Teaching you fun and interesting things to do with your digital images. Whether it's highlighting a new app, or a tutorial on how to edit a photo, we want to help you make the most of your memories.

Featured Thought

Visit our blog every Thursday when we will post a brand new thought or quote! What's the point of our 'Thursday Thought' feature? Because everyone could use a good one every now and then.

Customer Feedback

Want to see your raving reviews here? Comment on one of our social media sites, or email us at customerservice@larsendigital.com. We love hearing from you!

Digital Photo Makeover

Your old film and photos can go through a lot. Whether they are extremely discolored, torn or ripped by a child, involved in a flood or accident, we want to fix it!

Check This Out!

The world's very first photograph! We wouldn't have a business if the photography industry never progressed. It's amazing how far we come, and how advanced we continue to get.

We pride ourselves in our track record since we started business back in 1995. We have always made sure that each and every one of our customers is treated with professionalism along with a personal touch. We're proud to be the most trusted source of slide and negative scanning in North America. We are located beneath the snow-capped peaks of Mount Ben Lomond in Pleasant View, Utah. Pleasant View is 45 miles north of Salt Lake City, host of the 2002 Winter Olympics. All work is done in house here in Utah. We do not outsource any work out of the country like many other companies do.

Tuesday, March 13, 2012

Tuesday Tip: How to Remove Unwanted Portions From Your Pictures

The clone tool is great to use whenever you want to remove or add something to your digital image. Whether it is removing an unwanted person, or cleaning up the background, the clone tool is very handy in making small or big changes to your digital images.

Step 1: In Photoshop, select your clone stamp tool. This is located along your tool bar, and it looks like a rubber stamp.

Step 2: Select your brush type & size, you can find this on your top tool bar. Once you click on the the brush a larger window will open up. This will give you a sliding bar to select your brush diameter, hardness, and will also allow you to pick your brush type.

Your brush type can have softer edges or harder edges. The softer “fuzzy” edges will give you a softer lines which makes blending a little easier. The size will determine the diameter of the cloning effect. You will most likely change the size of your brush depending on what you are trying to clone out. The smaller the area, the smaller the tip you will want to use.

Step 3: Cloning means that you replace pixels of your image with pixels from another part of your image, which is generally referred to as your “sample”. First, you need to select your “sample”. To do this you hold down the ALT key & click your mouse on the color you want to use. You have now selected your sample for cloning.

You will notice that when you hover over a section of your image you will see your sample inside the brush tool. This will show you what it will look like when you clone over a specific spot. Just click with your mouse over the spot and you will have cloned over your unwanted section.

Tips to Remember:

-You do not want to clone out large chunks at once, you will want to slowly work around the unwanted section.

-Take your sample as close to the unwanted section as possible. This will give you the closest coloring & lighting.

-If you clone a section & you don't like how it looks, just hit ALT+CTRL+Z to back up.

-If you have hard edges left over from your cloning, use the healing tool after to smooth over those rough spots.


Monday, March 12, 2012

St. Patricks Day Giveaway!

The first person to comment and guess what the image is CORRECTLY will win the item pictured!
(The image will get clearer every day until a winner is declared)


May the luck of the Irish be with you!

Thursday, March 8, 2012

Thursday Thought


Monday, March 5, 2012

Digital Photo Restoration

Did you know... we have amazing artists who do incredible restoration work on your photos?
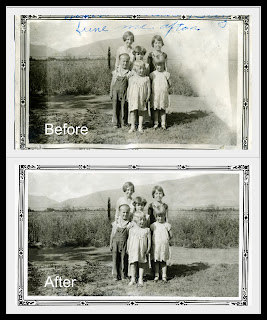
This picture had extreme fading in the upper right hand corner distracting from the subjects of the picture. It also had writing across the top.


Look how we were able to bring this picture back to life!

Want to see how much your restoration project would cost?
Visit us here!

Friday, March 2, 2012

4 Clover Deal!

Thursday, March 1, 2012

When you photograph people in colour

you photograph their clothes.

But when you photograph people in B&W,

you photograph their souls!

~Ted Grant

Tuesday, February 28, 2012

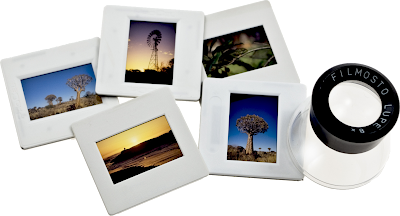
Beginners Guide to Scanning Your Slides

Slides won't last forever, no matter how you store them. Over time, the colors in the film will fade, and mold will eventually appear- distorting your image. Luckily, there is a way you can put a stop to this degradation. If you are interested in taking this project on by yourself, here are some steps you should take in order to get the best results.
  1. Get your slides out of storage! This first step may seem intimidating, as many don't have the slighted clue where they might be, but if you want to undergo the task of researching equipment, you will want to make sure you know where your slides are first! You’ll also want to know how many slides you actually have and what kind of project you’ll be looking at.

  1. Research and find the right scanner to fit your needs. Things you will want to keep in mind when looking for scanners: budget & desired quality. As with most things, the better the quality, the higher the price tag. You can buy a film scanner for as little as $50, but your results will definitely suffer. The best scanners will have a technology known as 'Digital Ice' that will digitally remove most dust and scratch marks- enhancing the appearance of your film. Many scanners will also have a type of “auto-feed” system for slides, making it so that you can pre-load a number of images (usually up to 50) and have them scan automatically. If you determined in step 1 that you have a lot of slides, this will be an option worth looking at.

  1. Choose your software.

  • Scanning software: Most scanners come with proprietary scanning software. In most cases, this is sufficient. However, this isn’t always the case and there are other options for getting the most out of your newly purchased scanner. VueScan is the most recommended program in scanning your slides. Not only does it offer automatic color correction, but it will scan automatically as well (when paired with a scanner that has the same capabilities). It is compatible with almost any brand and model of scanner available, even those not currently on the market. In addition, if you have an old scanner but can’t find the drivers, VueScan comes preloaded with drivers for it. It also is updated on a regular basis, so even the newest of scanners should be compatible. It’s available for Windows, MacOS, and Linux. An all-around great buy.

  • Photo Editing Software – While the scanning software makes a big difference with the quality of image you’ll get from your slides, inevitably you will need to touch them up with some photo editing software. With a program like Photoshop or PaintShop, you can manually fix brightness/contrast, fade, color correction, and with the right skills, you can even edit scratches and mold out of your images. On a tight budget? Free online photo editing options exist, such as Pixlr.com. Just upload your image and you can do color and brightness correction from your browser. Very simple and best of all, it’s free!

  1. Physically organize your slides before scanning. Whether it’s a mistake made during scanning or you simply want to look at the original slide, be sure to keep them organized. This will come in handy and make it much easier to sort through them to find the slide you’re looking for. Keeping your groups around 50 slides tends to be the sweet spot. It’s a number that’s manageable and still works well with many automatic feeders. In addition, you will have less sorting to do from your computer once they are scanned.

  1. Set up your scanner and software with your desired settings. Make sure you have read the user manuals on each item you use to ensure the best results possible.

    • Color & Brightness - If you’re a beginner, use the automatic settings for color and brightness. This will dynamically select the best option for the slide that is currently being scanned. You can sometimes achieve better results by manually changing the settings for each image – but this can be tedious and time-consuming. The default automatic settings for most software will usually achieve great results. And if you happen to find an unsatisfactory image, then you can simply rescan it with manual settings. If your scanner has ‘Digital Ice’ capability, then make sure this is selected.

    • Resolution – For slide scanners, 4000 DPI (Dots, or pixels, Per Inch) tends to be the highest available. Lower resolutions are, naturally, lower quality and higher resolutions aren’t usually any better because the slides don’t contain enough information to make it beneficial. When in doubt, opt for the highest DPI your scanner provides. Memory is cheap nowadays, and you’ll feel better knowing you’ve gotten all the detail from your slides.

    • Format – JPEG and TIFF are the most common. TIFF is a completely uncompressed image, and its files are generally about 4x as large as a comparable JPEG. While JPEG is technically compressed, you’ll want to make sure to set the compression settings to the lowest possible if you go this route. Unless you’re an avid photographer, JPEG will be the best option.

  1. Go ahead and scan your slides! While scanning with an automatic feeder, watch out for slides that get jammed and don't get fully captured. Enjoy the everlasting results!

Thursday, February 23, 2012

A Message From Our President

Thursday, February 16, 2012

Thursday Thoughts

A great photograph is a

full expression

of what one feels about what is being photographed in the

deepest sense,

and is, thereby, a

true expression

of what one feels about life in its entirety.

~Ansel Adams

Follow Us!

We are now on

Pinterest!

http://pinterest.com/larsendigital/

Follow us for more great information as well as inspiration!

Wednesday, February 15, 2012

FREE Weber State Tickets!


To get your FREE tickets, call us at 1-801-782-5155
or
visit our store at

1144 W 2700 N
Pleasant View, UT 84404

After Valentine's Day Coupon

Unlucky in our giveaway? Well here's a coupon to smooth things over:

----------Print the Coupon Below and Save!----------

15 Prints free with any order over $100
Order your FREE 15 Prints Today!


Tuesday, February 14, 2012

Happy Valentine's Day!


Make sure all your most loveable moments are not only captured, but preserved through Larsen Digital!

Giveaway Winner!

The winner of the Flip MonoHD video Camera is....

Nigel Masters!

Congrats! Stay tuned for more coupons, deals, and giveaways!

Monday, February 13, 2012

The Weber State Wildcats are ON FIRE this season! Get your FREE tickets to either the men's or women's game today!

Weber State Men's Basketball

Weber State vs. University of Texas-Arlington

Saturday February 18th 6:00 pm

Voucher good for 4 free tickets – while supply lasts.

Must redeem at WSU Ticket Office

Weber State Women's Basketball

Weber State vs. Northern Colorado

Saturday February 25th 2:00 pm

Voucher good for 4 free tickets – while supply lasts.

Must redeem at WSU Ticket Office


NO PURCHASE NECESSARY!

To get your FREE Vouchers- call or visit our office!

801-782-5155

1144 W 2700 N Pleasant View UT, 84404

Thursday, February 9, 2012

Valentine's Day Giveaway!

Wednesday, February 1, 2012

Coupon for $10 OFF a $50 purchase!

Larsen Digital Services Coupon Below! Print to receive your savings!


Monday, January 30, 2012


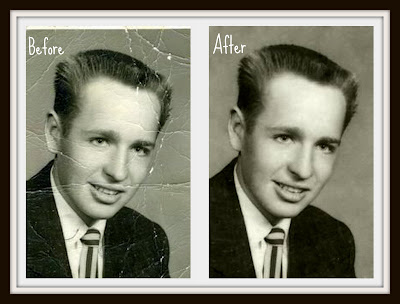
Check out this makeover! Looks like this picture has been crumpled- but who wants to throw this memory away when we can fix it for you!


We have dedicated artists who treat your precious photos as their own, and work hard to bring your memories back to life.

Check out more restoration examples here

Get your personalized restoration quote today!
Larsen Digital Services
1-800-776-8357

Friday, January 27, 2012


Question: What type of editing is going to be done on my digitized images?

Answer: We offer a few different editing options.

Standard Servicing (suggested option) includes:
-Color Correction (automated)
-Fade Correction (automated)
-Image Rotation
-1 Folder per every 50 Images
-All editing included in the Silver Scanning price (starting at just $0.35/slide!)

Premium Servicing includes:
-Full featured professional post scan manual image adjustments by a PhotoShop Expert. (manual color correction, contrast adjustment, minor spot treatment, manual cropping)
-Image Rotation
-1 Folder per every 50 Images
-All editing included in the Gold Scanning price (starting at just $0.69/slide!)
Link
Restoration Editing:
Restores your old pictures. We can fix photos that have been ripped, crumpled, burnt edges, etc. We can also add color to your black and white photos. Price depends on work requested.

Check out some examples on our website here!

Wednesday, January 25, 2012

Press Release From Larsen Digital Services

Larsen Digital Services Sponsors Weber State University Athletics Department 2011-2014

Salt Lake City, UT, January 25, 2012 --(PR.com)-- Sponsorship allows for additional funding for athletic scholarships and archiving sports photos and memorabilia.

Larsen Digital Services – Preserving Your Memories, has become a title sponsor of the Weber State Athletics Department. As part of the partnership, Larsen Digital is the official provider of Weber State University photo and film digital conversion services. Larsen Digital will be assisting WSU in their efforts to digitally archive sport slides, photos, negatives, video, and movie film from 1962 to present.

Weber State University is a member of the Big Sky conference and has a long history of conference championships and several appearances in the NCAA Basketball Tournament. This year’s team includes the top scorer in the country; Damian Lillard who is has been named to the John Wooden Award Midseason Top 25 list, which was announced Tuesday by The Los Angeles Athletic Club on ESPNU’s The Experts sports talk show. Selected by the Wooden Award National Advisory Board, the list is made up of 25 student-athletes who, based on their performances in November, December, and the beginning of January, are the frontrunners for college basketball’s most prestigious honor. Damian has also been named a finalist for the Bob Cousy Award, named for Hall of Famer and former Boston Celtic Bob Cousy, which recognizes the top point guard in college basketball.

“At Larsen Digital we know how important it is to keep a record of our history, and a large part of someone’s history is through film, photos and videos. We take great pride that we can preserve a piece of history before it is forgotten and lost forever,” said Brent Larsen, CEO of Larsen Digital. “By using the highest quality equipment and a professional team of people, we are able to produce the highest quality digital services.”

This sponsorship will allow sports fans to view newly digitized sports photos that have never been seen before. As the world moves to a digital platform we are proud to have been be chosen to help Weber State University Athletics move their proud history forward into the digital world.

For more information on Larsen Digital Services go to www.LarsenDigital.com

Wednesday, January 18, 2012

A 35- Foot long camera?!

This 35 Foot long camera, called the "Eye of America" produces 6 foot long negatives!


We are going to need a bigger scanner!

Read more about it at:
http://www.petapixel.com/2012/01/18/a-35-foot-long-camera-that-exposes-6-foot-tall-negatives/

FREE Shipping!


Order today at larsendigital.com!

Tuesday, January 17, 2012

It's time to digitize your memories when...

-You reminisce with your family about a past photo, but can't find the picture anywhere!

-You stick a tape into a VHS player to watch, and the film gets stuck inside, or better yet- you don't have a way to watch your VHS tapes since the technology has moved on to better devices.

-You are still trying watch movie film through a projector

-Your way of remembering that one vacation to that one place is viewing slides in a plastic sheet

-You are still walking around with a “Walkman” in order to listen to your old audio tapes

-Your child/grandchild’s favorite activity is looking through old scrapbooks and photos albums so they can rip all the pictures out, or draw whiskers and mustaches on the subjects.

-You try to take a picture of old photos with your digital camera or phone to upload it to your favorite social website.


Just know it's 2012.... IT'S TIME!

Thursday, January 12, 2012


Of all of our inventions for mass communication, pictures still speak the most universally understood language.
- Walt Disney

Wednesday, January 11, 2012

10% OFF any standard print size order!

----------Print Your Coupon Below and Save TODAY!----------

Want more information? Visit us at http://www.slidescanning.com/photo-scanning.htm

Tuesday, January 10, 2012

Choosing a company to preserve your memories can be tough! To make sure you get the best bang for your buck, make sure you research each of your prospective companies in the following areas:

Resolution is one of the biggest factors determining the quality of your digital images. Resolution means how much "information" or dots/pixels are in your digital image. The more dots/pixels, the sharper your image will be and the higher quality digital image you will get.

It's the same concept as Megapixels and digital cameras. The higher the Megapixels, the higher quality your image will be.

Over time, the dyes in film will fade, leaving film discolored. This is why every slide, negative and photograph that you scan should receive a color correction treatment.

In an attempt to keep their rates low some companies outsource all their scanning work outside the USA. They try and hide this fact by having you send your slides to a facility in the states, such as California, Texas or Arizona. Once your film and video has arrived in their state side location, they package it up again, and it is shipped out of the country on a barge ship. In a recent article it was estimated that 10,000 cargo containers are lost at sea each year. Read Full Article

Instead of painstakingly trying to merge, organize, and sort all of your photo memories, pick a company who will upload your scanned images to a website where you can do all the organization and custom naming you want!

Don't want it? You should be able to delete images for free!

Equipment should be a big factor in your decision. Choose a company who respects your precious belongings enough to scan it with equipment that will do the job the way you want!

Do you know whether you want a JPEG vs TIFF digital file?

A lot of companies may scan your film for a cheap price, but you are going to get a cheap return. Make sure you get the best results possible from your memories. It is one choice you will never regret!

Want to know more about what Larsen Digital Services has to offer? Visit us at www.larsendigital.com

Wednesday, January 4, 2012

Movie Film Color Correction

Larsen Digital offers a color correction service on movie film! Check out these amazing transformations:


Want to bring your movie film memories back to life? Visit us HERE

$10 OFF a $50 purchase!


----------Print your coupon below and receive $10 OFF!----------


For more information on how to order, visit us HERE!

Tuesday, January 3, 2012


Today's Tip:
How to keep your image files safe after archiving them!

First, you've sent your photos, slides, or other film format to Larsen Digital Services for memory preservation. Now what? We give your files back to you either on a CD, DVD, USB flash drive, or an External Hard Drive. While these are the best options right now for the safekeeping of your images, there are extra precautions you can take to ensure the safety of your files!

-Save a copy of your images to your personal computer. Not only does this give you an extra copy of each file, but now you can upload your photos to Facebook, Blogger, or Twitter! You always want to make sure that you have at least one backup of your images.

-If you received your images on a DVD or CD, then a good idea would be to purchase an external hard drive, or USB flash drive (depending on how much room you need) to keep another set of images on. You will want to store this hard drive in a well conditioned area. You can also store backups of important documents and files as well. Then, if your personal computer crashes you have that extra hard drive with everything important to you on it! You can find many cost-effective hard drives at online merchants such as NewEgg.com, mwave.com, and others.

-There are on-line file storage companies which keep your files safe and accessible. However, there is a monthly charge for this service depending on how much storage you need. You will definitely want to make sure the company you choose offers password protection, as well as an encrypted file transfer.

DID YOU KNOW...
Larsen Digital Services offers a 5 Year Data SafeKeeping Program? If you use us to digitize your important treasures, you can pay a one time fee to have us keep your images for 5 Years! After that 5 Years is complete, feel free to renew it for another one time fee, and have peace of mind knowing your memories are safe! Price starts at only $8.15!

Monday, January 2, 2012


This picture had the corner torn off, it's wrinkled, and the edges are completely worn. A lot of people would think there is no helping this cause... that's where Larsen Digital comes in!


We were able to re-create the arm and dress, fix the borders and wrinkles, and adjust the coloring. It's truly amazing!

Cost of this project: $90.00
Memories re-lived: priceless!
Learn more about our photo restoration and repair here.