Tips, Tricks, and Tutorials

Teaching you fun and interesting things to do with your digital images. Whether it's highlighting a new app, or a tutorial on how to edit a photo, we want to help you make the most of your memories.

Featured Thought

Visit our blog every Thursday when we will post a brand new thought or quote! What's the point of our 'Thursday Thought' feature? Because everyone could use a good one every now and then.

Customer Feedback

Want to see your raving reviews here? Comment on one of our social media sites, or email us at customerservice@larsendigital.com. We love hearing from you!

Digital Photo Makeover

Your old film and photos can go through a lot. Whether they are extremely discolored, torn or ripped by a child, involved in a flood or accident, we want to fix it!

Check This Out!

The world's very first photograph! We wouldn't have a business if the photography industry never progressed. It's amazing how far we come, and how advanced we continue to get.

We pride ourselves in our track record since we started business back in 1995. We have always made sure that each and every one of our customers is treated with professionalism along with a personal touch. We're proud to be the most trusted source of slide and negative scanning in North America. We are located beneath the snow-capped peaks of Mount Ben Lomond in Pleasant View, Utah. Pleasant View is 45 miles north of Salt Lake City, host of the 2002 Winter Olympics. All work is done in house here in Utah. We do not outsource any work out of the country like many other companies do.

Tuesday, April 24, 2012

Pixlr Photo Editing Tutorial

vintage retro effects tutorial


Pixlr.com is a photo editing website that offers free editing tools. It is the easiest software I have ever worked with.
I am so excited to share how great this website is.

First: Go to www.pixlr.com

Step 1 Retro Effect:

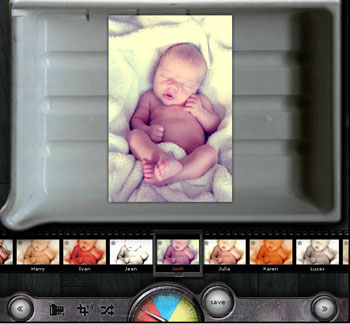
Click on the circle that says "Computer"
This will allow you to browse your hard drive & pick a photo to add fun retro effects.
Once you have selected your photo it will appear on screen.
vintage retro effects tutorial

Step 2 Retro Effect:

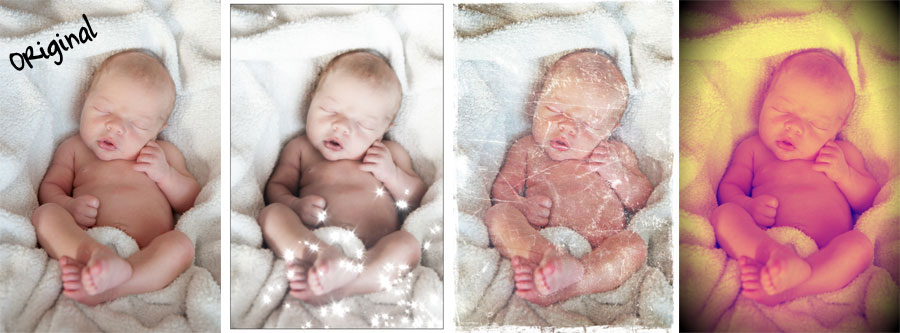
First, we will add an effect to the digital image.
If you look below there is a film strip, this is where you will select from your different effects.
Start clicking through the different effects on the film strip and it will automatically apply the
effect to your picture. There are a lot to choose from and they are a lot of fun.
Once you have found an effect you like, you can move on to adding an overlay.

Step 3 Retro Effect:

Next, we can work on adding an overlay.
If you notice at the bottom middle part of your screen there is a three colored odometer,
click on the blue triangle. Click through the different overlay effects.
Some of them are really dramatic and others are more subtle.
Once you have chosen your overlay you can move on to adding a border.

Step 4 Retro Effect:

Click on the yellow triangle of the odometer and you can click through the different borders.

Step 5 Retro Effect:

Once you are done you just need to save your image. You can either hit the SAVE button
or hit the button with the two forward arrows. You can either save your file as a jpg or an imm.io.
The imm.io a Pixlr service to easily share the image online with friends and family.
For now, I am just saving my images onto my hard drive.

Tips


vintage retro tutorial

-If you ever want to go back a step click on the button with the two arrows pointing to the left
-Next to the left arrows you will see a negative canister image, if you click on it, you will have access to even more effects, overlays & borders to choose from.
-Next to the negative canister there is a crop button that will adjust your crop on your picture.
-Next to the crop button there are two crisscrossed arrows. This will randomly apply different effects, overlays & borders to your digital image.
-Next to the odometer is a SAVE button, which means you can save your image at any time. So if you want a version saved with just an effect or just the overlay & nothing else you easily can.

Monday, April 23, 2012

FREE Video Tape!


Get your free video tape transfers today!

Thursday, April 12, 2012

Thursday Thought

Tuesday, April 10, 2012

Beginners Guide: How to Resize Your Images

As the years pass, digital images are coming with higher and higher quality. Typicially, the higher the quality is, the higher the megapixels are, resulting in a large file size. When emailing digital images, you don't want to attach a10MB file- so you will need to resize it. Other hassles you might run into include uploading digital images to various social sites that have file size or dimension restrictions. Resizing your digital image will avoid these problems and make it easier for friends and family to view your digital image.

To understand what size you want, you need to understand what "pixels" mean. A digital image is made up of pixels or dots. The number of pixels per square inch is what makes up your dimension. For example, a 12 Megapixel digital camera will give you the dimensions 4000x3000.

When emailing pictures to friends & family, I like to resize my images to ~2000 pixels on the long side.

To resize an image in Photo Shop follow these steps:

Resizing Step 1

Go to your tool bar & select IMAGE
Then select IMAGE SIZE
Or just hit " ALT+Ctrl+I "

Resizing Step 2

A window will pop up which will tell you what your current dimensions are set at. You can work in pixels or percents -I prefer to work in pixels.

resize digital image

I am going to change my width to 2000,, which automatically changed my height to 1500. This is important to note, because if the box "Constrain Proportions" is unchecked, you will end up with a squished image (See Example Below). Having this box checked means that when you change one dimension, the other dimension will change in relation.

Hit "OK" when you are done changing your dimensions.

Resizing Oops!


resizing image preserve aspect ratio

Resizing Step 3

You are almost done resizing your image- you just need to save your file. IMPORTANT - don't save over your larger image, create a new copy.

Go to your tool bar & select FILE,
then go down to SAVE AS
& then create a new file name.

If you are saving a JPEG image a window will pop up asking what quality settings you want. Unless want to compress you image, save it as Maximum quality setting.

That's it! You now know how to resize a digital image!

Wednesday, April 4, 2012

Wednesday Deal: FREE Shipping!

Get Free Shipping on your order to Larsen Digital Services!

Tuesday, April 3, 2012

How to Edit Your Photos in PaintShop

Do you have digital images that just don't look right? Pictures often get faded, or gain a reddish or bluish hue. You can fix these imperfections simply using editing software like PaintShop Pro. After reading these steps, you should be a pro at applying simple editing effects to your own digital images.

1- Lets get your settings in place. Once you have opened up Paint Shop, you will see a gray bar that spans the width of your software window (under the choices for 'File', 'Edit', etc). Right click on this gray bar and scroll down to the option "Toolbars". To the left of "Toolbars" will be choices for which tools you want to have open in that gray space. Click on "photo", and those editing options should appear. To find out what each icon in the toolbar does, just hover your mouse over the icon.

2- Make sure your image is rotated correctly! It's really hard to edit a photo when you don't have the right perspective on what it is. The easiest way to do this is to open the image that needs to be rotated. On your top tool bar you will find three icons in a row containing blue and white shapes, with arrows directing which way they are being rotated. These are your rotation tools. Just click on the direction that your image needs to be rotated. You will keep your image open for the rest of the editing process.

3- Next, let's take a look at your contrast/brightness. No one wants a photo that looks faded or soft. To make you images look more crisp, you will want to adjust the Contrast/Brightness of your photo. The Contrast/Brightness tool takes the blacks and whites in your images and enhances them. The icon is of a triangle, where the top is a light blue, and the bottom of it is black. Click on the icon, and a window will pop up requiring you to fill in numbers for both the contrast level, and the brightness level. If your image is really dark, start out by setting your levels both to 10, then press 'OK'. Repeat until you get your desired results. If the brightness of your picture is fine, but you just want it to look a little more crisp, set your contrast number to 10, and your brightness number to 0. Again, you will want to press 'OK' and repeat until you attain your desired results. To preview what your effects are going to look like, just press the icon that looks like an eye, which is in the 'Contrast/Brightness' window. If you like what you see, press 'OK'. If you don't like the selections you've made, simply press the eye again, which will hide the preview, and re-configure your settings.

4- Now we are going to focus on color. There are several ways to adjust the color on your images, but this technique is a manual tool where you can choose exactly what you want to be applied to your picture. The 'Adjust Color Balance' tool is a triangle that is light blue on top, and black on bottom, with a halo containing red and blue squares on the tip of the triangle. Click on this icon, and a window will pop up. Set your 'Tone Balance' to 'Midtones', and check the box beneath to 'Preserve luminance'. You will find that there are three scroll lines to adjust the color. You can either manually enter numbers in the white boxes, or you can manually move the cursor left or right to select how much you want to adjust a certain color. For instance, if your image has taken on a reddish hue, you will move the cursor between the choices 'cyan' and 'red' to the left, towards 'cyan'. This will add more cyan hues to your image, decreasing the amount of red that appears. A lot of color balancing is trial and error. To preview what your effects are going to look like, just press the icon that looks like an eye, which is in the 'Adjust Color Balance' window. If you like what you see, press 'OK'. If you don't like the selections you've made, simply press the eye again, which will hide the preview, and re-configure your settings.

Now your image looks as good as new. Have scratches, wrinkles, or writing on your images? You will need to use the 'cloning' tool to fix this, which is a whole other ball game! Check out tutorials on using the clone tool in PaintShop to make your editing skills complete.

Monday, April 2, 2012

Monday Makeover: Weber State!

We have the opportunity to scan Weber State University's collection of old film. Today, we are featuring one from their basketball collection. It's faded, off-colored, and looks out of date...

Our color technicians were able to restore the vivid colors and bring the contrast to where it should be, making this makeover a slam dunk!

Want more info about our editing services? Visit us today!