
Teaching you fun and interesting things to do with your digital images. Whether it's highlighting a new app, or a tutorial on how to edit a photo, we want to help you make the most of your memories.

Visit our blog every Thursday when we will post a brand new thought or quote! What's the point of our 'Thursday Thought' feature? Because everyone could use a good one every now and then.
Want to see your raving reviews here? Comment on one of our social media sites, or email us at customerservice@larsendigital.com. We love hearing from you!
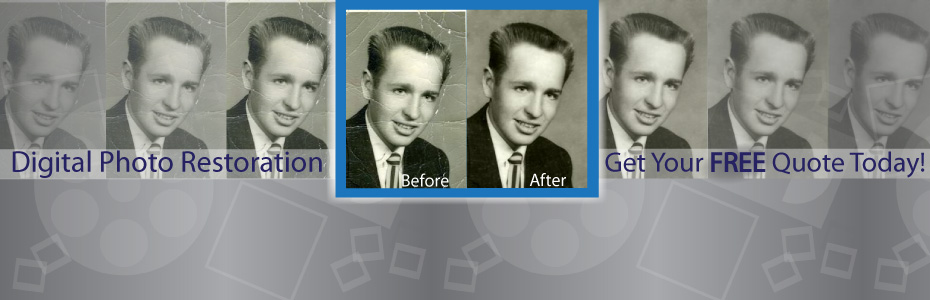
Your old film and photos can go through a lot. Whether they are extremely discolored, torn or ripped by a child, involved in a flood or accident, we want to fix it!
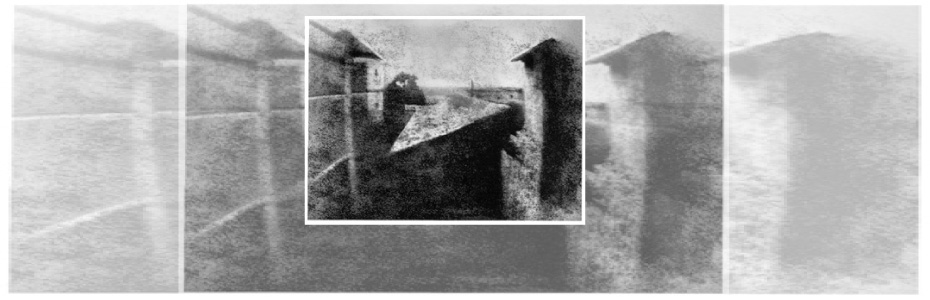
The world's very first photograph! We wouldn't have a business if the photography industry never progressed. It's amazing how far we come, and how advanced we continue to get.


As the years pass, digital images are coming with higher and higher quality. Typicially, the higher the quality is, the higher the megapixels are, resulting in a large file size. When emailing digital images, you don't want to attach a10MB file- so you will need to resize it. Other hassles you might run into include uploading digital images to various social sites that have file size or dimension restrictions. Resizing your digital image will avoid these problems and make it easier for friends and family to view your digital image.
To understand what size you want, you need to understand what "pixels" mean. A digital image is made up of pixels or dots. The number of pixels per square inch is what makes up your dimension. For example, a 12 Megapixel digital camera will give you the dimensions 4000x3000.
When emailing pictures to friends & family, I like to resize my images to ~2000 pixels on the long side.
Go to your tool bar & select IMAGE
Then select IMAGE SIZE
Or just hit " ALT+Ctrl+I "
A window will pop up which will tell you what your current dimensions are set at. You can work in pixels or percents -I prefer to work in pixels.

I am going to change my width to 2000,, which automatically changed my height to 1500. This is important to note, because if the box "Constrain Proportions" is unchecked, you will end up with a squished image (See Example Below). Having this box checked means that when you change one dimension, the other dimension will change in relation.
Hit "OK" when you are done changing your dimensions.
You are almost done resizing your image- you just need to save your file. IMPORTANT - don't save over your larger image, create a new copy.
Go to your tool bar & select FILE,
then go down to SAVE AS
& then create a new file name.
If you are saving a JPEG image a window will pop up asking what quality settings you want. Unless want to compress you image, save it as Maximum quality setting.
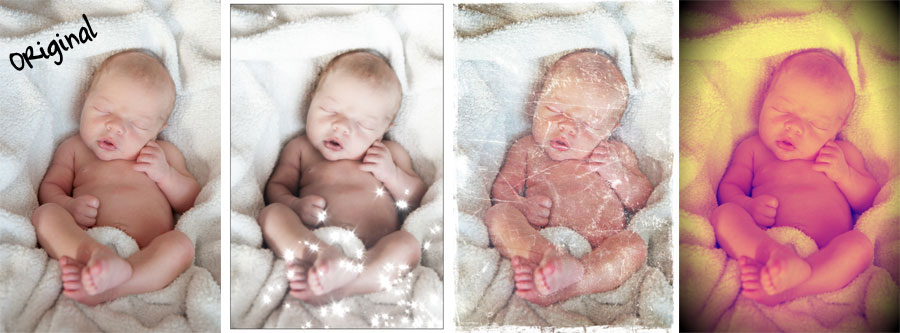
Do you have digital images that just don't look right? Pictures often get faded, or gain a reddish or bluish hue. You can fix these imperfections simply using editing software like PaintShop Pro. After reading these steps, you should be a pro at applying simple editing effects to your own digital images.
1- Lets get your settings in place. Once you have opened up Paint Shop, you will see a gray bar that spans the width of your software window (under the choices for 'File', 'Edit', etc). Right click on this gray bar and scroll down to the option "Toolbars". To the left of "Toolbars" will be choices for which tools you want to have open in that gray space. Click on "photo", and those editing options should appear. To find out what each icon in the toolbar does, just hover your mouse over the icon.
2- Make sure your image is rotated correctly! It's really hard to edit a photo when you don't have the right perspective on what it is. The easiest way to do this is to open the image that needs to be rotated. On your top tool bar you will find three icons in a row containing blue and white shapes, with arrows directing which way they are being rotated. These are your rotation tools. Just click on the direction that your image needs to be rotated. You will keep your image open for the rest of the editing process.
3- Next, let's take a look at your contrast/brightness. No one wants a photo that looks faded or soft. To make you images look more crisp, you will want to adjust the Contrast/Brightness of your photo. The Contrast/Brightness tool takes the blacks and whites in your images and enhances them. The icon is of a triangle, where the top is a light blue, and the bottom of it is black. Click on the icon, and a window will pop up requiring you to fill in numbers for both the contrast level, and the brightness level. If your image is really dark, start out by setting your levels both to 10, then press 'OK'. Repeat until you get your desired results. If the brightness of your picture is fine, but you just want it to look a little more crisp, set your contrast number to 10, and your brightness number to 0. Again, you will want to press 'OK' and repeat until you attain your desired results. To preview what your effects are going to look like, just press the icon that looks like an eye, which is in the 'Contrast/Brightness' window. If you like what you see, press 'OK'. If you don't like the selections you've made, simply press the eye again, which will hide the preview, and re-configure your settings.
4- Now we are going to focus on color. There are several ways to adjust the color on your images, but this technique is a manual tool where you can choose exactly what you want to be applied to your picture. The 'Adjust Color Balance' tool is a triangle that is light blue on top, and black on bottom, with a halo containing red and blue squares on the tip of the triangle. Click on this icon, and a window will pop up. Set your 'Tone Balance' to 'Midtones', and check the box beneath to 'Preserve luminance'. You will find that there are three scroll lines to adjust the color. You can either manually enter numbers in the white boxes, or you can manually move the cursor left or right to select how much you want to adjust a certain color. For instance, if your image has taken on a reddish hue, you will move the cursor between the choices 'cyan' and 'red' to the left, towards 'cyan'. This will add more cyan hues to your image, decreasing the amount of red that appears. A lot of color balancing is trial and error. To preview what your effects are going to look like, just press the icon that looks like an eye, which is in the 'Adjust Color Balance' window. If you like what you see, press 'OK'. If you don't like the selections you've made, simply press the eye again, which will hide the preview, and re-configure your settings.
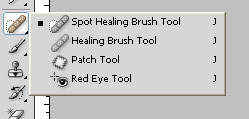
Now your image looks as good as new. Have scratches, wrinkles, or writing on your images? You will need to use the 'cloning' tool to fix this, which is a whole other ball game! Check out tutorials on using the clone tool in PaintShop to make your editing skills complete.


We sat down with Pixorial to ask them about how their services can benefit anyone around the world. They allow you to view, edit, and customize your videos and movie film online- truly giving you the control on updating your precious memories.
Pixorial allows people to share their video memories with family and friends anywhere, what inspired the creation of Pixorial? One summer, our founder, Andres Espiñeira, was busy digitizing his father’s large collection of film. He quickly came to two important realizations. The first was that in those videos were the collected memories of not just his mother and father, but also a number of other family members, friends and acquaintances who were also captured in the videos. Clearly, these old family movies would prove meaningful to a group of people outside his father’s household. The second realization was that just getting that video converted was the tip of the iceberg. Once digitized, how could that video be shared with friends and family who would find meaning in the video?
This experience drove his desire to create a platform where users could share and collectively interact with video from anywhere (analog, digital, mobile and HD) to where it matters most – with friends and family. Knowing that we all choose to share video differently, he thought it was important that the platform also remove the barriers created by the walled gardens of social platforms, and that memories captured could be shared with others.
What is the most convenient feature about Pixorial? Most convenient - and also most powerful - is our “Share to Crowd” feature. This allows anyone to share a video in its entirety with friends and family so that they can own, edit and share their favorite parts as well. Using this feature, users can unleash the stories in their crowd and empower their friends and family to tell their own stories through video.
You can download your edited videos off Pixorial's website to your home computer. Are you then free to upload and share your home movies on websites like Facebook? We actually recommend that users keep their videos protected in their Pixorial library. Downloading a copy is always an option but to truly protect those videos from hard drive failure, natural disaster or even human error, the cloud is the safest place. And because we’re a software company, we make sure that your video is accessible and ready to play in the latest format.
As far as sharing goes, Pixorial provides an extensive list of share options including Facebook, Twitter, LinkedIn, YouTube, Vimeo, 1000memories and more. We want to make sure that you always have your original videos available to you from anywhere, along with the ability to share how you wish. We also make it possible to share via email, Videocard or DVD.
How long do you store your customer's videos? We store a user’s videos for as long as they have an account. We store up to 1 gigabyte of video for free and offer a variety of membership plans to meet the needs of any consumer.
If people only have their movies on a DVD or Hard Drive, can they still benefit from the services Pixorial has to offer? Absolutely, users can easily upload those videos and use our simple editing tools to share their videos online or create custom productions.
Can a customer take portions from one movie and add it to another? With our Premium accounts, users can create a montage video using their videos or even videos captured and shared from friends and family. We believe that everyone is a storyteller, and have made it very easy to bring videos together with our web-based editing platform, Pixorial Producer.
In your editing features, customers have the ability to add music. Do you have music on your website for people to choose from, or do they need to provide their own? We provide access to 1600 music tracks that cover a variety of genres. Users can also upload their own music tracks. Once a music track or several tracks are added, the user can adjust the ratio between the video’s own recorded sound and the music track. Music is often a great addition to combined videos, videos where photos have been added, or as a way to cancel out a loud or bad sound recording.
Do you have an app for the i-phone or android? We have video apps for the iPhone and Android so that users can not only capture and share on the go, they can also have access to their entire lifetime of videos without worrying about taking up space on their mobile device.
I see that you are now offering Videocards. What a unique take on sharing past experiences. Is this an included feature in a membership? Videocards are a feature available to consumers of all levels. We believe that the best stories are told with video and created Videocards as a gift that anyone could use to celebrate a special occasion or to just say hi.
Being part of restoring a lost family memory can be a very personal experience. Do you feel connected to your customers? We do. We are so lucky to be in the business of bringing memories to life. We hear wonderful stories on a regular basis for how people are using Pixorial to reconnect with friends, to remember or honor loved ones and as a way to collaborate around shared experiences.
Why is it important for people to share their past? We are living in a time where people are sharing more and more. Though pictures, through status updates, through check-ins and of course, video. Memories happened before the digital age, and sharing those memories provides a moving experience for all who were there. It’s common for people to look through old pictures, but viewing old videos has never been easy; the devices used to show old film and tape is becoming obsolete. Like anyone else, we don’t want our past to fade with time. The technology exists to protect, preserve and share those precious memories!
Get Started with Pixorial Videocards:
This week we are taking a closer look at Pixorial, a partner of ours. Pixorial offers you the chance to customize your movie film the way you want! Some of their features include the opportunity to view, edit, and share your videos online. With Larsen Digital and Pixorial teamed up, your memories are truly given a new breath of life! Check out the video below for more information about Pixorial!
Video: About Pixorial


Step 1: In Photoshop, select your clone stamp tool. This is located along your tool bar, and it looks like a rubber stamp.

Step 2: Select your brush type & size, you can find this on your top tool bar. Once you click on the the brush a larger window will open up. This will give you a sliding bar to select your brush diameter, hardness, and will also allow you to pick your brush type.

Your brush type can have softer edges or harder edges. The softer “fuzzy” edges will give you a softer lines which makes blending a little easier. The size will determine the diameter of the cloning effect. You will most likely change the size of your brush depending on what you are trying to clone out. The smaller the area, the smaller the tip you will want to use.
Step 3: Cloning means that you replace pixels of your image with pixels from another part of your image, which is generally referred to as your “sample”. First, you need to select your “sample”. To do this you hold down the ALT key & click your mouse on the color you want to use. You have now selected your sample for cloning.
You will notice that when you hover over a section of your image you will see your sample inside the brush tool. This will show you what it will look like when you clone over a specific spot. Just click with your mouse over the spot and you will have cloned over your unwanted section.
Tips to Remember:
-You do not want to clone out large chunks at once, you will want to slowly work around the unwanted section.
-Take your sample as close to the unwanted section as possible. This will give you the closest coloring & lighting.
-If you clone a section & you don't like how it looks, just hit ALT+CTRL+Z to back up.
-If you have hard edges left over from your cloning, use the healing tool after to smooth over those rough spots.

 Did you know... we have amazing artists who do incredible restoration work on your photos?
Get your slides out of storage! This first step may seem intimidating, as many don't have the slighted clue where they might be, but if you want to undergo the task of researching equipment, you will want to make sure you know where your slides are first! You’ll also want to know how many slides you actually have and what kind of project you’ll be looking at.
Research and find the right scanner to fit your needs. Things you will want to keep in mind when looking for scanners: budget & desired quality. As with most things, the better the quality, the higher the price tag. You can buy a film scanner for as little as $50, but your results will definitely suffer. The best scanners will have a technology known as 'Digital Ice' that will digitally remove most dust and scratch marks- enhancing the appearance of your film. Many scanners will also have a type of “auto-feed” system for slides, making it so that you can pre-load a number of images (usually up to 50) and have them scan automatically. If you determined in step 1 that you have a lot of slides, this will be an option worth looking at.
Choose your software.
Scanning software: Most scanners come with proprietary scanning software. In most cases, this is sufficient. However, this isn’t always the case and there are other options for getting the most out of your newly purchased scanner. VueScan is the most recommended program in scanning your slides. Not only does it offer automatic color correction, but it will scan automatically as well (when paired with a scanner that has the same capabilities). It is compatible with almost any brand and model of scanner available, even those not currently on the market. In addition, if you have an old scanner but can’t find the drivers, VueScan comes preloaded with drivers for it. It also is updated on a regular basis, so even the newest of scanners should be compatible. It’s available for Windows, MacOS, and Linux. An all-around great buy.
Photo Editing Software – While the scanning software makes a big difference with the quality of image you’ll get from your slides, inevitably you will need to touch them up with some photo editing software. With a program like Photoshop or PaintShop, you can manually fix brightness/contrast, fade, color correction, and with the right skills, you can even edit scratches and mold out of your images. On a tight budget? Free online photo editing options exist, such as Pixlr.com. Just upload your image and you can do color and brightness correction from your browser. Very simple and best of all, it’s free!
Physically organize your slides before scanning. Whether it’s a mistake made during scanning or you simply want to look at the original slide, be sure to keep them organized. This will come in handy and make it much easier to sort through them to find the slide you’re looking for. Keeping your groups around 50 slides tends to be the sweet spot. It’s a number that’s manageable and still works well with many automatic feeders. In addition, you will have less sorting to do from your computer once they are scanned.
Set up your scanner and software with your desired settings. Make sure you have read the user manuals on each item you use to ensure the best results possible.
Color & Brightness - If you’re a beginner, use the automatic settings for color and brightness. This will dynamically select the best option for the slide that is currently being scanned. You can sometimes achieve better results by manually changing the settings for each image – but this can be tedious and time-consuming. The default automatic settings for most software will usually achieve great results. And if you happen to find an unsatisfactory image, then you can simply rescan it with manual settings. If your scanner has ‘Digital Ice’ capability, then make sure this is selected.
Resolution – For slide scanners, 4000 DPI (Dots, or pixels, Per Inch) tends to be the highest available. Lower resolutions are, naturally, lower quality and higher resolutions aren’t usually any better because the slides don’t contain enough information to make it beneficial. When in doubt, opt for the highest DPI your scanner provides. Memory is cheap nowadays, and you’ll feel better knowing you’ve gotten all the detail from your slides.
Format – JPEG and TIFF are the most common. TIFF is a completely uncompressed image, and its files are generally about 4x as large as a comparable JPEG. While JPEG is technically compressed, you’ll want to make sure to set the compression settings to the lowest possible if you go this route. Unless you’re an avid photographer, JPEG will be the best option.
Go ahead and scan your slides! While scanning with an automatic feeder, watch out for slides that get jammed and don't get fully captured. Enjoy the everlasting results!


