Congratulations to....
Melissa Dussol
for guessing correctly and winning our giveaway prize!

She won a NIX Digital Photo Frame!


Teaching you fun and interesting things to do with your digital images. Whether it's highlighting a new app, or a tutorial on how to edit a photo, we want to help you make the most of your memories.

Visit our blog every Thursday when we will post a brand new thought or quote! What's the point of our 'Thursday Thought' feature? Because everyone could use a good one every now and then.
Want to see your raving reviews here? Comment on one of our social media sites, or email us at customerservice@larsendigital.com. We love hearing from you!

Your old film and photos can go through a lot. Whether they are extremely discolored, torn or ripped by a child, involved in a flood or accident, we want to fix it!
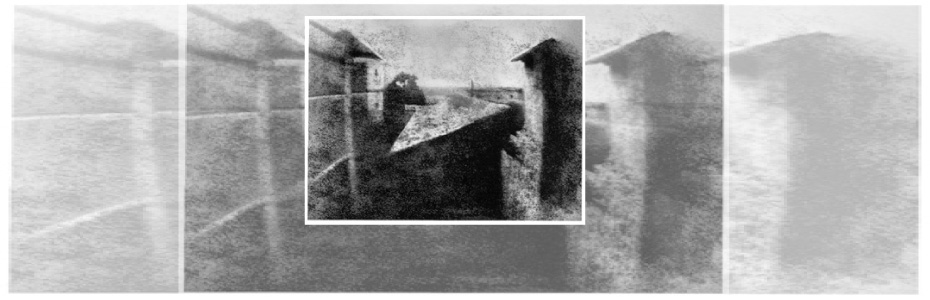
The world's very first photograph! We wouldn't have a business if the photography industry never progressed. It's amazing how far we come, and how advanced we continue to get.


Step 1: In Photoshop, select your clone stamp tool. This is located along your tool bar, and it looks like a rubber stamp.

Step 2: Select your brush type & size, you can find this on your top tool bar. Once you click on the the brush a larger window will open up. This will give you a sliding bar to select your brush diameter, hardness, and will also allow you to pick your brush type.

Your brush type can have softer edges or harder edges. The softer “fuzzy” edges will give you a softer lines which makes blending a little easier. The size will determine the diameter of the cloning effect. You will most likely change the size of your brush depending on what you are trying to clone out. The smaller the area, the smaller the tip you will want to use.
Step 3: Cloning means that you replace pixels of your image with pixels from another part of your image, which is generally referred to as your “sample”. First, you need to select your “sample”. To do this you hold down the ALT key & click your mouse on the color you want to use. You have now selected your sample for cloning.
You will notice that when you hover over a section of your image you will see your sample inside the brush tool. This will show you what it will look like when you clone over a specific spot. Just click with your mouse over the spot and you will have cloned over your unwanted section.
Tips to Remember:
-You do not want to clone out large chunks at once, you will want to slowly work around the unwanted section.
-Take your sample as close to the unwanted section as possible. This will give you the closest coloring & lighting.
-If you clone a section & you don't like how it looks, just hit ALT+CTRL+Z to back up.
-If you have hard edges left over from your cloning, use the healing tool after to smooth over those rough spots.

 Did you know... we have amazing artists who do incredible restoration work on your photos?
 Slides won't last forever, no matter how you store them. Over time, the colors in the film will fade, and mold will eventually appear- distorting your image. Luckily, there is a way you can put a stop to this degradation. If you are interested in taking this project on by yourself, here are some steps you should take in order to get the best results.
 Get your slides out of storage! This first step may seem intimidating, as many don't have the slighted clue where they might be, but if you want to undergo the task of researching equipment, you will want to make sure you know where your slides are first! You’ll also want to know how many slides you actually have and what kind of project you’ll be looking at.
Research and find the right scanner to fit your needs. Things you will want to keep in mind when looking for scanners: budget & desired quality. As with most things, the better the quality, the higher the price tag. You can buy a film scanner for as little as $50, but your results will definitely suffer. The best scanners will have a technology known as 'Digital Ice' that will digitally remove most dust and scratch marks- enhancing the appearance of your film. Many scanners will also have a type of “auto-feed” system for slides, making it so that you can pre-load a number of images (usually up to 50) and have them scan automatically. If you determined in step 1 that you have a lot of slides, this will be an option worth looking at.
Choose your software.
Scanning software: Most scanners come with proprietary scanning software. In most cases, this is sufficient. However, this isn’t always the case and there are other options for getting the most out of your newly purchased scanner. VueScan is the most recommended program in scanning your slides. Not only does it offer automatic color correction, but it will scan automatically as well (when paired with a scanner that has the same capabilities). It is compatible with almost any brand and model of scanner available, even those not currently on the market. In addition, if you have an old scanner but can’t find the drivers, VueScan comes preloaded with drivers for it. It also is updated on a regular basis, so even the newest of scanners should be compatible. It’s available for Windows, MacOS, and Linux. An all-around great buy.
Photo Editing Software – While the scanning software makes a big difference with the quality of image you’ll get from your slides, inevitably you will need to touch them up with some photo editing software. With a program like Photoshop or PaintShop, you can manually fix brightness/contrast, fade, color correction, and with the right skills, you can even edit scratches and mold out of your images. On a tight budget? Free online photo editing options exist, such as Pixlr.com. Just upload your image and you can do color and brightness correction from your browser. Very simple and best of all, it’s free!
Physically organize your slides before scanning. Whether it’s a mistake made during scanning or you simply want to look at the original slide, be sure to keep them organized. This will come in handy and make it much easier to sort through them to find the slide you’re looking for. Keeping your groups around 50 slides tends to be the sweet spot. It’s a number that’s manageable and still works well with many automatic feeders. In addition, you will have less sorting to do from your computer once they are scanned.
Set up your scanner and software with your desired settings. Make sure you have read the user manuals on each item you use to ensure the best results possible.
Color & Brightness - If you’re a beginner, use the automatic settings for color and brightness. This will dynamically select the best option for the slide that is currently being scanned. You can sometimes achieve better results by manually changing the settings for each image – but this can be tedious and time-consuming. The default automatic settings for most software will usually achieve great results. And if you happen to find an unsatisfactory image, then you can simply rescan it with manual settings. If your scanner has ‘Digital Ice’ capability, then make sure this is selected.
Resolution – For slide scanners, 4000 DPI (Dots, or pixels, Per Inch) tends to be the highest available. Lower resolutions are, naturally, lower quality and higher resolutions aren’t usually any better because the slides don’t contain enough information to make it beneficial. When in doubt, opt for the highest DPI your scanner provides. Memory is cheap nowadays, and you’ll feel better knowing you’ve gotten all the detail from your slides.
Format – JPEG and TIFF are the most common. TIFF is a completely uncompressed image, and its files are generally about 4x as large as a comparable JPEG. While JPEG is technically compressed, you’ll want to make sure to set the compression settings to the lowest possible if you go this route. Unless you’re an avid photographer, JPEG will be the best option.
Go ahead and scan your slides! While scanning with an automatic feeder, watch out for slides that get jammed and don't get fully captured. Enjoy the everlasting results!


Weber State Men's Basketball
Weber State vs. University of Texas-Arlington
Saturday February 18th 6:00 pm
Voucher good for 4 free tickets – while supply lasts.
Must redeem at WSU Ticket Office
Weber State Women's Basketball
Weber State vs. Northern Colorado
Saturday February 25th 2:00 pm
Voucher good for 4 free tickets – while supply lasts.
Must redeem at WSU Ticket Office
NO PURCHASE NECESSARY!
To get your FREE Vouchers- call or visit our office!
801-782-5155
1144 W 2700 N Pleasant View UT, 84404


-You stick a tape into a VHS player to watch, and the film gets stuck inside, or better yet- you don't have a way to watch your VHS tapes since the technology has moved on to better devices.
-You are still trying watch movie film through a projector
-Your way of remembering that one vacation to that one place is viewing slides in a plastic sheet
-You are still walking around with a “Walkman” in order to listen to your old audio tapes
-Your child/grandchild’s favorite activity is looking through old scrapbooks and photos albums so they can rip all the pictures out, or draw whiskers and mustaches on the subjects.
-You try to take a picture of old photos with your digital camera or phone to upload it to your favorite social website.


 Choosing a company to preserve your memories can be tough! To make sure you get the best bang for your buck, make sure you research each of your prospective companies in the following areas:
 Resolution is one of the biggest factors determining the quality of your digital images. Resolution means how much "information" or dots/pixels are in your digital image. The more dots/pixels, the sharper your image will be and the higher quality digital image you will get.
 In an attempt to keep their rates low some companies outsource all their scanning work outside the USA. They try and hide this fact by having you send your slides to a facility in the states, such as California, Texas or Arizona. Once your film and video has arrived in their state side location, they package it up again, and it is shipped out of the country on a barge ship. In a recent article it was estimated that 10,000 cargo containers are lost at sea each year. Read Full Article
Instead of painstakingly trying to merge, organize, and sort all of your photo memories, pick a company who will upload your scanned images to a website where you can do all the organization and custom naming you want!
Equipment should be a big factor in your decision. Choose a company who respects your precious belongings enough to scan it with equipment that will do the job the way you want!
Do you know whether you want a JPEG vs TIFF digital file?


